Good movie from kite…

Far too long since I’ve written anything.  I’ve been quite busy, mostly with baking activities that I’ll have to ‘backfill’ as I get a chance…

But yesterday, finally got a decent day to put the blue parafoil up at the Tauranga waterfront, along with the GoPro camera.  I had, earlier in the day, ‘re-rigged’ the Picavet camera stabilising rig (see an earlier posting) using a heavier line – not that it needed to be stronger, but I was getting tired of untangling the finer line I had originally used.
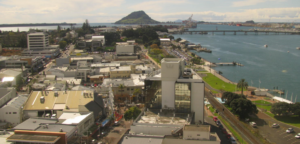
Click on this image to see the larger version so you can spot my kite off to the right above the wharf!

What I was hoping was that I could have it in the air long enough to get recorded by a Tauranga webcam.  That camera takes a picture every 10 minutes through the day – and I figured if I had the kite up, it should be visible when I get home to check that webcam.  And it was – you can see the blue shape appearing to float above the wharf off to the right side of the picture!

The flight itself was not particularly long (a  bit over 4 minutes of film) and somewhat limited as I only had a small roll of line, so couldn’t put it especially high into the air.  Given it is central city and not a very big place to fly a kite, that’s probably a good thing.

You can see me launching the kite.  I had it relatively low in the air, up until the 3 minute mark when I have let out all the line.  I see there’s something of a scratch of some such on the lens, just to the left of centre – I try not to look at it…

And naturally, when I was finished, I went to have a beer at the Crown and Badger!


Camping and kites…

We took our caravan up to the Bowentown Motor Camp for two nights last weekend.  Averil spent time fishing, I got to fly some kites.

Finally, a good chance to see the blue parafoil at its best.  Friday’s winds were a bit erratic, but I got both the purple and the blue parafoils flying well.  Never easy to take good photos of kites in the air, as once you get them up high enough, they are just specks on the photo, anyway.  And given it was just a cellphone camera, the kites were generally out of focus (if you click on the image to the right, you will get a better version of it…)

Both kites had substantial amounts of tail, to counteract the gusty wind.  First time I’ve flown the blue parafoil with both the long tail but also the drogue at the end of that.  It looked pretty good!

When I went down to the beach on Saturday ( a 3 minute walk from the caravan) I forgot to take the bag with the tails – so flew the blue parafoil without any tail.  Light but steady wind meant it flew very well, though very sluggish when I raised the camera with it.

The blue parafoil was amazingly responsive – I could let it drop down to not far above the path to the beach.  Then, just pulling in a few metres of line, I could get it to climb rapidly up to nearly overhead.  I think the shallow aerofoil shape has given it this responsiveness – much more than any of the other parafoils I’ve made.

Finally, a breeze…

Kite is powering, pulling strongly, as it moves to the upper left of the screen. Note the fins at the bottom, both left and right, billowing out…

After taking various kites on the bike with me to town, I finally got a day with at least the beginnings of a kite-flying wind yesterday.

I put the purple parafoil up, since it hasn’t had any flying for awhile.

The kite is a scaled up version of the first parafoil I ever made, and has quite a deep aerofoil.  That gives it a bit more drag overall – the newer blue parafoil has a much slimmer aerofoil.

My main dislike of it is that the outside bottom fins are made so that rather than having three fins down the line, like the ones in the middle, the outside has a larger bottom fin that takes the place of two.  It seems to blow out somewhat in flight, and just doesn’t look as nice as the design of the blue kite.

But it flew well, and without any tail to compensate for errors – as a kitemaker, that is one of my ‘measures of success’ in making a parafoil.  You can, and generally do, have to have some sort of tail or drogue on parafoils.  But if they are made well, they can and should be able to fly without, I say!

A bit of catch-up…

Well, if this WordPress set up is going to effective, I’ll have to get better at making postings!

Turns out the kite day was a bit of a fizzer – not really enough wind to do much with.

I took both kites and ebike to Wellington a few weeks back – Wellington famed for its wind (and beer!).  But the wind was either knockdown – literally, as we crossed the street above Oriental Parade – or cold, horizontal, heavy rain.  So no kites or ebike rides.

The bike odometer has now passed 4,000km – that was just on the one year mark.

And I’ve been doing some more baking, having made a sourdough starter to try something new!

OK – I promise I will make more frequent postings.  Yes…

Kite day coming…

Though I’ve not referred to it here much, there is a kite day this coming Sunday at Fergusson Park for Matariki.  I’m not usually much for kite days, as I’m not overly social (!) at the best of times.
There is a predominance of massive (nothing wrong with that…) ‘kites’ that hang from a pilot kite, rather than fly on their own and finally – made by other people.  I think I’m good evidence that you don’t need to know how to sew to make kites – just don’t look too close at the stitching!

But this will be the first I’ve been to when I’m only bringing soft kites.  No sticks (apart from several that are part of the kite messenger).

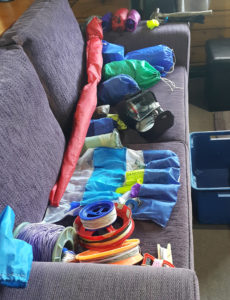
3 parafoils
4 panflutes
6 parasleds
9 reels of line
1 picavet rig with camera
1 static dropper rig
3 misc droppers
1 ferry with dropper bag
hammer and stakes
1 set of night lights

I’m not counting the silver flowform yet – it hasn’t flown properly.  And the one bit of wind that it could/should have used makes me think the aerofoil shape is not right – and I am in the process of putting some ‘darts’ into the foils near the leading edge, trying to give it more lift than it currently has.

Semi-success with the ferry…

Thursday I met up with Averil at the waterfront after she had an appointment in town.  Though the wind was not ideal, we managed to fly the blue parafoil and some mixed results with the ferry and dropping things.

Tauranga Harbour and a pretty sharp southerly wind.

I had carried all the kite gear there from home on my ebike.  edbikes.co.nz  I’m making my EdBike work for its money…

The kite was biasing to the left, to the point that it would lose the air into the openings at the top – and then collapse to the ground!  So I did a bit of line trimming.  By the end of the session, it was pretty stable.

The ferry is something of a hassle to set up and work with in the wind.  But I launched it up probably a dozen times.  “Ideal” would be the ferry goes up, hits the stopper, drops whatever, and returns down the line.  I did get that a few times – but also had real issued with the trigger point on the kite getting caught up into the wire that runs through the polystyrene ball that is the stopper.  I don’t think it really needs that ball – I’m going to replace it with a piece of pool noodle.

The sail on the ferry probably could do with a bit of tail of its own.  It has a tendency to swing about, and even start wrapping around the line.  But I’d say the stopper issue above was more significant – get that fixed and all might be well…

Preparing to launch the ferry.

I had reasonable success with just sending the ferry up, letting it trip, and fall back down the line.  I did that on its own a few times to confirm that it could function well on its own.  Now just to get a better way of carrying the payload, I think.

A ‘less than successful’ attempt, with the ferry catching on the stopper, then bringing the kite down.  Second video has a more positive attempt, with the ferry rising and falling as it should…

My Picavet rig…

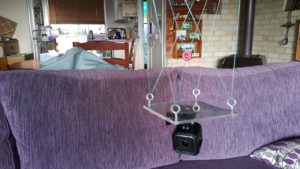
Since I had the blue kite line stretched across the living room to take photos of the ferry, I got out my Picavet rig for a picture, too.

It has a long history – initially developed to provide stability for the (early) camera attempts from hot air balloons, I think.  Here’s a good description of it generally:

https://publiclab.org/wiki/picavet-rigging

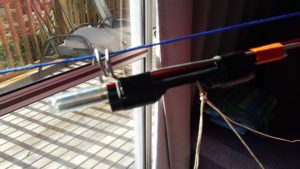
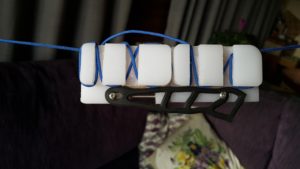
And here’s my rig.  It has a plastic base, and uses eye screws for the line to run through.  Better would be some smooth action pulleys.  But I gotta say – you don’t try to take photos from a kite expecting serious stability.  For me at least, it just isn’t going to happen.

But there are other people using more sophisticated systems that can do better.  I’m just happy with any photos – or even poor quality movies! – that I can take from my kites.
Sidetracked: I made a kite ferry…

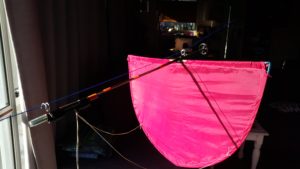
Looking up the kite line. The release mechanism is at the lower left. The two strings attach to the sail – and when they are released (when the ferry gets to the stopper), the sail flaps loosely, allowing the ferry to come back down the line. Maybe too fast, but we’ll see…

I’ve put the silver flowform aside, as my initial sewing was pretty abysmal.  I think I’ve got the tension, etc, right now…

So yesterday and today I used what scraps of materials I could find to make a kite ferry…

I think about dropping things from kites (an admirable pastime!) in three categories.

  • A simple dropper. Elastic/rubber creates the tension – when you jerk on the line, the two pieces separate, allowing the ring to drop away. But then you have to pull it in again if you want to drop something else…

    A simple dropper.  The ‘payload’ is attached to the kite line and raised up into the sky.  It is dropped by some (unspecified) mechanism.  Kenny Noble and I tried to perfect a knot that could tie a plastic parachute to the kite line, and then release it with a series of tugs.  Not always successful, and really at the bottom of the hierarchy in my mind!  I’ve made one device that uses rubber bands as resistance, allowing it (sometimes) to drop the payload when it is pulled – but it is pretty fine tuning to keep it from extending and prematurely dropping.

  • Next would be a kite messenger.  In this case, the device (along with the payload) runs up the kite line on its own.  When it hits a ‘stopper’ on the line, it releases the payload.  But the messenger doesn’t have any way of coming back down the line.
  • The release area. When the front of the ferry hits the stopper, it pushed a fibreglass rod back through the main rod. And the items held by that rod drop away. And one of them holds the lines that hold the wing against the wind . And it can then slide back down the line.

    Then comes the pinnacle, in my opinion – the kite ferry.  This is a device that will climb the kite line, hit a stopper, drop its payload – but then change configuration so it can slide back down the line.  Though I’m dropping various junk, the longer term plan is to use this device to drop fishing hooks – allowing Averil to ‘cast’ her fishing line much further out than she would otherwise be able.

This is the second substantial messenger I have made.  The first was over-built, but did sometimes, periodically, occasionally work.  I’ve not persevered with it over the last year much.

Last thing to do is to work out an effective stopper – maybe a polystyrene ball?  I have had mixed results making the ‘disk’ type stopper.  They have worked, but I’m hoping for something more workable.

And my final design feature relates to my wanting to be able to break the device apart, roll it up and carry it easily.  I think this one might be a winner, eventually.

Silver flowform almost all cut out…

The kite has only 10 pieces in total.

All but the ribs have been cut now. 3 keels, front and back are done.

I’ve now created brown paper patterns for all but the front and back – those are measured directly onto the fabric.

Seam allowance around everything, though sometimes a bit rough.

Both the front and back of the kite have a range of circular air scoops/vents.  So far, I’ve cut them out with an old soldering iron.  But I want to have a go at reinforcing them with stitches.  The sewing machine is capable; am I?