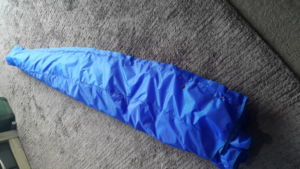
After several days of pretty serious (for me) sewing, I’ve finished it. Again, my intention to be neat and tidy went out the window…
But it will, hopefully, fly. But may not find out today – raining in Tauranga!

After several days of pretty serious (for me) sewing, I’ve finished it. Again, my intention to be neat and tidy went out the window…
But it will, hopefully, fly. But may not find out today – raining in Tauranga!
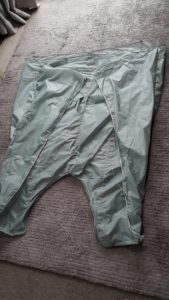
I’ve put the silver flowform aside, as my initial sewing was pretty abysmal. I think I’ve got the tension, etc, right now…
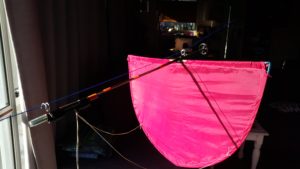
So yesterday and today I used what scraps of materials I could find to make a kite ferry…
I think about dropping things from kites (an admirable pastime!) in three categories.
A simple dropper. The ‘payload’ is attached to the kite line and raised up into the sky. It is dropped by some (unspecified) mechanism. Kenny Noble and I tried to perfect a knot that could tie a plastic parachute to the kite line, and then release it with a series of tugs. Not always successful, and really at the bottom of the hierarchy in my mind! I’ve made one device that uses rubber bands as resistance, allowing it (sometimes) to drop the payload when it is pulled – but it is pretty fine tuning to keep it from extending and prematurely dropping.
Then comes the pinnacle, in my opinion – the kite ferry. This is a device that will climb the kite line, hit a stopper, drop its payload – but then change configuration so it can slide back down the line. Though I’m dropping various junk, the longer term plan is to use this device to drop fishing hooks – allowing Averil to ‘cast’ her fishing line much further out than she would otherwise be able.
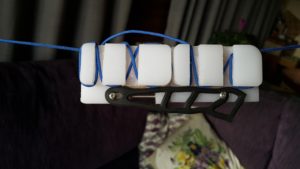
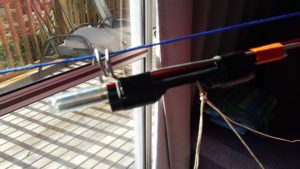
This is the second substantial messenger I have made. The first was over-built, but did sometimes, periodically, occasionally work. I’ve not persevered with it over the last year much.
Last thing to do is to work out an effective stopper – maybe a polystyrene ball? I have had mixed results making the ‘disk’ type stopper. They have worked, but I’m hoping for something more workable.
And my final design feature relates to my wanting to be able to break the device apart, roll it up and carry it easily. I think this one might be a winner, eventually.
The kite has only 10 pieces in total.

I’ve now created brown paper patterns for all but the front and back – those are measured directly onto the fabric.
Seam allowance around everything, though sometimes a bit rough.
Both the front and back of the kite have a range of circular air scoops/vents. So far, I’ve cut them out with an old soldering iron. But I want to have a go at reinforcing them with stitches. The sewing machine is capable; am I?
The blue parafoil is finished – and I’m going to strike while the iron is hot to start making another kite! Striking with a hot iron, even just a hot soldering iron, is something you need to be careful of when working with rip stop nylon!
Flowform kites have a lot in common with parafoils, but are not nearly so ‘elegant’. But considerably easier to sew, and since I’ll be sewing this one myself, that is a real factor.
The kite will be just under a metre wide, and a bit over 1.1 metres wide. The lack of exactitude here is due to the fact that the pattern is done in inches, and I’m converting to metric for the layout. Gets a bit confusing…
Here’s the article from the old Kitelines magazine that I’m using as my guideline: Flow Form Kite
I recognised the maker’s name – Ed Grauel, assisted by the magazine editor, Margaret Gregor, and figured it must be a pretty reliable pattern. I can’t see any reference to the magazine in which it first appeared – it appears on the Internet as: http://www.kiteplans.org/planos/flowform5/flowform5.html
This .pdf parafoil kite plan is from https://www.kiteplans.org/planos/parafoil4/parafoil4.html, but I have used Google Translate. As you can see, it is about 35 years old, but I liked the approach by the author. It isn’t a plan to tell you how to make it – it just concentrates on quality calculations to create the patterns.
I didn’t use this so much as a ‘plan’ as for the shape of the aerofoil and fins. I relied on an element of trust when it came to some of the maths…
Sophia finished the last of the sewing last night – more than a half kilometer – (more than 1600 feet) of sewing. Estimation is based on the spool of cotton (well, polyester) that was used.

Then I sat on the couch are got/kept Paris the cat’s attention. She enjoyed the bridling process immensely.
So I stretched the kite out on its back, and gently pulled the strings, trying not to disrupt the relative flatness, as the 18 fins gently lifted. I could then, letting the strings run through my fingers, position the soon-to-be towing point above the kite. I’m aiming for about a 22 degree ‘angle of attack’, the angle the face of the kite will be, based on the pull of the line below it.

That shallow angle of attack, combined with the relative ‘thinness’ of the aerofoil shape that I am using will produce, I hope, a really high performance pulling kite!
The bridling I did last night was pretty rough – I’m not expecting immediate success at stable flying. It has a lot of fine-tuning to go before I can teach it to fly (heh, heh).
First flight might be later today…
We had some time off from making the blue parafoil, what with life and other commitments…
But got seriously stuck in yesterday. We had completed the stitching to attach the 18 ‘fins’ from the face of the kite, as well as the 11 ‘aerofoils’ coming off the back of the face.
Yesterday was a lot of repetition, pinning and sewing the aerofoils to the back square of nylon. This involves sewing a curved shape to a straight line – not massively difficult, but I reverted to pinning rather than ‘hot tacking’ the nylon with an old soldering iron.
So now ready for the last vertical seam. In order that the rough edges of the seam will be inside the pocket, the entire kite is rolled and folded so that all of the kite is inside the final pocket. The process is sometimes called a ‘burrito roll’ by kitemakers.
When I did my own sewing in the past on parafoil kites, I would often be a bit sloppy, and end up sewing through layers that I should not have – and then having to go back to unpick it to try again. With Sophia’s vigilant eyes, I have been more exacting and methodical in the folding back and pinning.
I’ve already got the lines ready to attach to the 18 tow points on the fins, so after this last vertical stitch, the kite will emerge from that last pocket like unrolling a rolled up sock. Then one last seam across the bottom to close off the trailing edge of the pockets.
First flight maybe today? Something of a deadline, as Sophia will be leaving tomorrow…

We’ve got the (31) pieces of the parafoil ready. So far the sewing has been pretty straightforward, so to speak. The next job will be to join both the front fins and the flat edge of the aerofoil shape to the 1.5M square front piece. That will be a combination of tacking and pinning to make sure the seams get all the layers they should. But the final sewing, putting the 1.5M square back piece onto the curved side of the aerofoil, creating the pockets, will be the most demanding. Not only do you have to contend with sewing to the curve, but also making sure seams on both left and right side are inside their pockets. And the last seam, as I remember from previous parafoil constructions, involves putting the entire kite into one of its pockets, and having to use extra care not to stitch through any of it when the seam is done. I have confidence in Sophia’s sewing expertise!
The new parafoil is now in pieces, cut from the bright blue material. 1 front piece, 1 back, 18 fins (6 each of 3 patterns) and 11 aerofoil pieces – 31 pieces of ripstop nylon in total.
Hot cut using a soldering iron. Sophia has added about 5 meters of bias binding.
I need to do some maths to work out the location of some lines that will help distribute the towing tension, but figured drinking a beer has precedence.
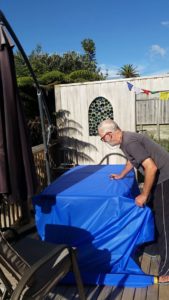
A local childcare centre was throwing out some stuff, including a glass table top which had been a bit defaced with scratching. But a good size to put on top of our outdoor table to use as a kite cutting and pattern-making table.
I’ve calculated all the data points for making a large, but pretty straightforward, parafoil. It will be the fourth ‘proper’ parafoil I’ve made over the years.

The finished kite will have 10 ‘pockets’ – I’ve never made one with more than 6 previously. The kite will be about 1.5M wide and just under that in height – it will likely be too strong to hand fly. I’ll need to tie it down, I expect…
I’ve marked the glass with marking pens – and it can be wiped off later to start another project. Next job is to cut some brown paper pattern pieces.
My daughter Sophia is going to be doing all the sewing – that takes away a heap of trouble and worry for me…